

E-Way Bill Management in BUSY
E-Way Bill is an Electronic Way Bill for movement of goods which can be generated through E- Way Bill Portal (ewaybill.nic.in). For Central transaction, any B2B/B2C transaction exceeding INR 50,000 is applicable for E-Way Bill. For local transaction, every state government has set different rules. For example, In Delhi any B2B transaction exceeding INR 1,00,000 is applicable for E-Way Bill.
When an E-Way Bill is generated from E-Way Bill Portal, a unique E-Way Bill Number (EBN) is allocated and is available to the supplier, recipient and the transporter.
Implementation in BUSY
Implementation of E-Way Bill in BUSY includes various steps which are as follows:
Step 1: Setting Configuration and Feeding Masters Information
Step 2: Entering Transaction
Step 3: Generating E-Way Bill
a) For Standard & Enterprise Edition users following options are preferred to generate E- Way Bill:
Automatic upload of single/multiple vouchers
Generation of JSON file for single/multiple vouchers
b) For Basic Edition users only a single option is available to generate E-Way Bill:
Generation of Excel file for single/multiple vouchers
Step 1: Setting Configuration and Feeding Masters Information
Setting Configuration and Feeding Masters Information requires information to be fed for one time only. This information will be picked automatically at the time of voucher feeding and upload automatic or JSON/Excel file generation.
Following information is to be specified for one time only:
a) Setting Configuration
First of all you need to enable ‘E-Way Bill Required’ option in Company GST Configuration. To Enable ‘E-Way Bill Required’ option in Company GST Configuration click Administration à Configuration à Features/Options à GST/VAT tab. Specify ‘Y’ under ‘E-Way Bill Required’ option. If E-Way Bill is applicable for local transactions as well then specify ‘Y’ under ‘Transport
Details in Local Sale/Purchase’ option. Given below is the screenshot of GST/VAT window.
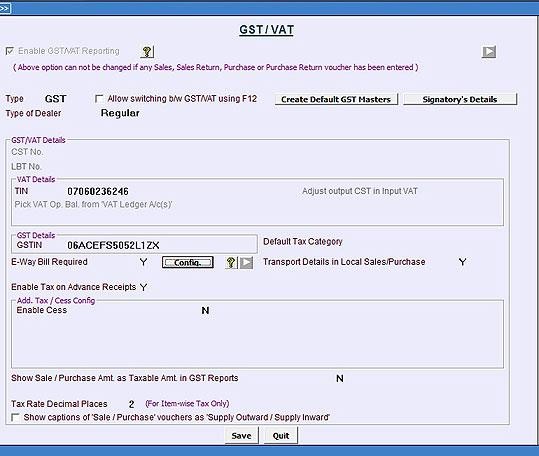
After specifying ‘Y’ under ‘E-Way Bill Required’ option, a Config. button appears. Click Config. button to set the configuration for E-Way Bill. On clicking Config. button, an E-Way Bill Configuration window appears. Given below is the screenshot of E-Way Bill Configuration window.
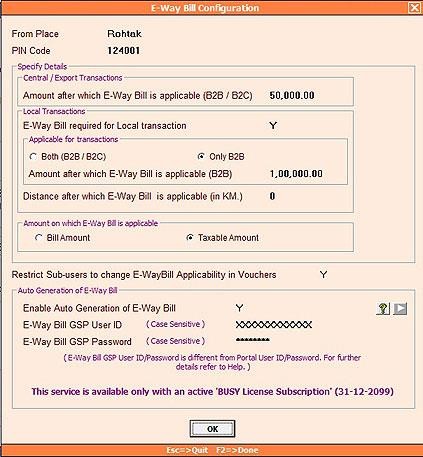
In E-Way Bill Configuration window following data field appears:
- From Place – Specify location/city from where the movement of goods will start.
- PIN Code – Specify PIN Code of location/city from where the movement of goods will start.
- Amount after which E-Way Bill is applicable (B2B/B2C) – Specify amount for central transaction (B2B/B2C) after which E-Way Bill will be applicable.
- E-Way Bill required for Local transaction – Specify ‘Y’ in this data field if E-Way Bill is required in local transactions.
- Applicable for transactions – Select whether E-Way Bill is applicable for ‘Both B2B/B2C’or ‘Only B2B’ transactions.
- Amount after which E-Way Bill is Applicable (B2B) – Specify amount for local transaction (B2B) after which E-Way Bill will be applicable.
- Distance after which E-Way Bill is applicable (in KM.) – Specify distance after which E- Way Bill will be applicable in case of local transactions. If E-Way Bill is applicable for all local transactions irrespective of distance, then leave this field as zero.
- Amount on which E-Way Bill is applicable – Select whether E-Way Bill will be applicable on ‘Bill Amount’ or ‘Taxable Amount’.
- Restrict Sub-users to change E-Way Bill applicability in Vouchers – Specify ‘Y’ in this data field if you want to restrict sub-user for not to change E-Way Bill applicability in vouchers.
- Auto Generation of E-Way Bill – Select this option for auto generation of E-Way Bill No. from BUSY at the time of voucher saving itself. For more details refer to document named ‘Auto Generation of E-Way Bill from BUSY’.
b) Specify E-Way Bill related details in Material Centre
IF you have multiple Godowns at different locations (with different Place & PIN Code), you need to specify E-Way Bill related details in Material Centre also. Given below is the screenshot of Modify Material Centre Master window.
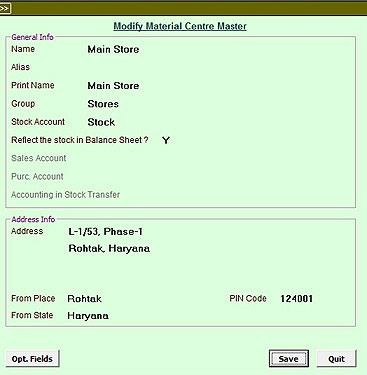
Following E-Way Bill related details need to be specified in below mentioned data fields:
-
- From Place – Specify location/city where Material Centre is located in this data field.
- PIN Code – Specify PIN Code of location/city where Material Centre is located in this data field.
- State – Specify State where Material Centre is located in this data field.
c) Specify E-Way Bill related details in Party Master
E-Way Bill related details such as Transporter Name, Station, PIN Code, Distance etc. needs to be specified in Party master. These details are mandatory to generate E-Way Bill. Given below is the screenshot of Party Master.
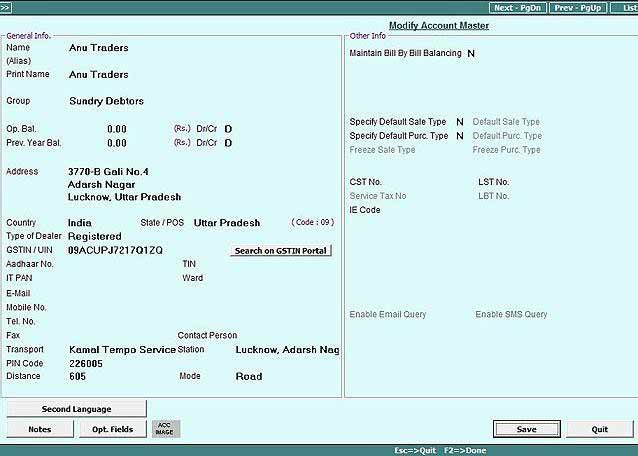
In Party Master specify E-Way Bill related details in the below mentioned data fields:
-
- Transport – Specify Transporter Name in this data field.
- Station – Specify Name of Place/locality where goods will be dispatched in this data field.
- PIN Code – Specify PIN Code of Place/Station where goods will be dispatched in this data field.
- Distance – Specify approximate distance between ‘From and To Place’ in this data field.
- Mode – Specify Mode of Transport (Road/Rail/Air/Ship) in this data field.
This information will be picked automatically at the time of voucher feeding and can be changed for that voucher if required.
Once the above information is specified in all Parties, your Master Information feeding is over.
Next, you need to specify ‘Transporter GSTIN/ID’ and other details through ‘Input Transporter’s GSTIN/ID’ utility. Input Transporter’s GSTIN/ID utility is available in Transactionsà GST Misc. Utilities menu. Given below is the screenshot of ‘Input Transporter’s GSTIN/ID’ utility.
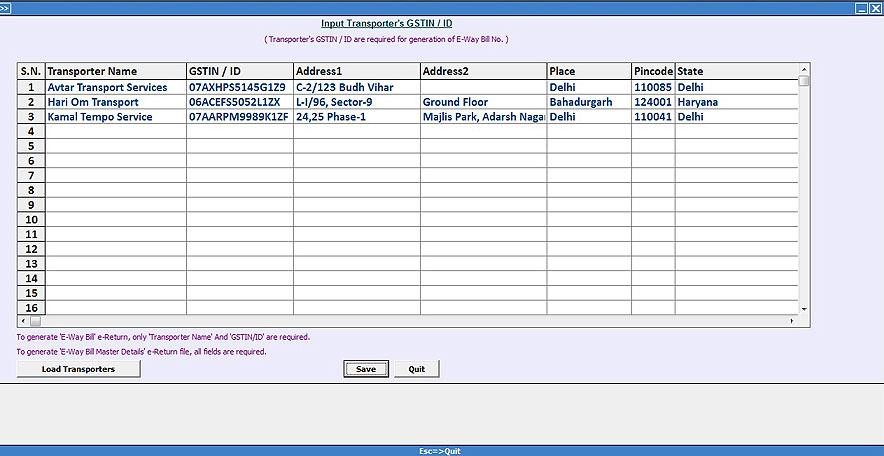
Please Note: To generate E-Way Bill number, only Transporter Name and GSTIN/ID is compulsory. Other fields are optional.
Step 2:Entering Transaction
Next you need to enter transaction i.e. Sales/Material issue voucher etc. While entering voucher, a ‘Transport Details’ window appears in which you need to specify the transport details like Transport, Station/To Place, PIN Code, Distance etc. By default these details will be picked from GST Configuration / Material Centre / Party Master but you can change them if required. Given below is the screenshot of Transport Details window that appears during voucher entry.
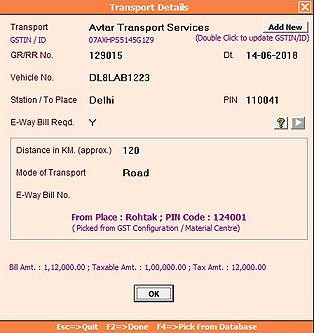
Please Note: To enter E-Way Bill No. in this data field, first you need to generate E-Way Bill No. from GST E-Way Bill Portal.
In Transport Details window, following details need to be specified:
-
- Transport – Specify Transporter Name in this data field. An ‘Add New’ button is provided to create transporter from here only. Below ‘Add New’ button a label ‘Double Click to update GSTIN/ID’ is provided. You can Double click on the label in case you want to update GSTIN or Transporter ID from here only.
- GR/RR No. – Specify GR/RR No. in this date field.
- Date – Specify date in this data field. By default voucher date will appear in this data field.
- Vehicle No. – Specify Vehicle No. in this data field.
- Station/To Place – Specify Station/To Place where goods have to be dispatch in this data field. By default this will be picked from Party Master, if specified.
- PIN Code – Specify PIN Code of Station/To Place in this data field. By default this will be picked from Party Master, if specified.
- E-Way Bill Reqd. – Specify ‘Y’ in this data field if E-Way Bill is applicable for the voucher and then specify approximate distance between ‘From and To Place’ and ‘Mode of Transport’s.By default some of the above details will be picked from GST Configuration/Material Centre/Party Master and you can change them if required.
- E-Way Bill No. – Specify E-Way Bill No. in this data field. To specify E-Way Bill No., first of all you need to generate E-Way Bill No. from E-Way Bill Portal. Once E-Way Bill No. is generated, open the voucher in Modify mode and enter E-Way Bill No.
Step 3: Generate E-Way Bill
- a) For Standard & Enterprise Edition users following options are preferred to generate E-Way Bill:
- Automatic generation of E-Way Bill for single/multiple vouchers
- Generation of JSON file for single/multiple vouchers
- b) For Basic Edition users only a single option is available to generate E-Way Bill:
- Generation of Excel file for single/multiple vouchers
Let us now discus the above mentioned options in detail.
For Standard & Enterprise Edition users all the three options mentioned above are available but it is preferred to use only the first two options.
Automatic generation of E-Way Bill for single/multiple vouchers
E-Way Bill can be generated automatically from BUSY. For more details refer to document named ‘Auto Generation of E-Way Bill from BUSY’.
Generation of JSON file for single/multiple vouchers
Please Note: It is advised to use JSON option only when there is some problem in using Automatic option.
To generate JSON file, enter voucher and specify transport details in Transport Details window. At the time of saving the voucher, an E-Way Bill message box appears. Given below is the screenshot of E-Way Bill message box.
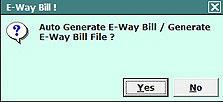
Click Yes button to generate E-Way Bill file. On clicking Yes button, a Generate E-Way Bill window appears. Given here is a screenshot of Generate E-Way Bill window.
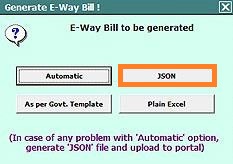
Select JSON option to directly generate JSON file from BUSY. On selecting JSON option, a Generate E-Way Bill file window appears with various data fields. Specify the required data in data fields and click OK button. On clicking OK button, a JSON Creation message box appears. Given below is the screenshot of JSON Creation message box.
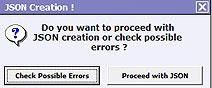
Click Check Possible Errors button to check for any error in data and rectify them, if any. It is recommended to always check for possible errors before generating JSON file so as to avoid any discrepancy at the time of generating E-Way Bill No. Once errors are rectified, click Proceed with JSON button. On clicking Proceed with JSON button, JSON file will be generated at the specified path.
Now, Upload the JSON file on E-Way Bill Portal and generate E-Way Bill No. Given below arethe steps showing how to generate E-Way Bill No. from portal?
Step 1: Go to website (ewaybill.nic.in) and Login on E-Way Bill Portal.
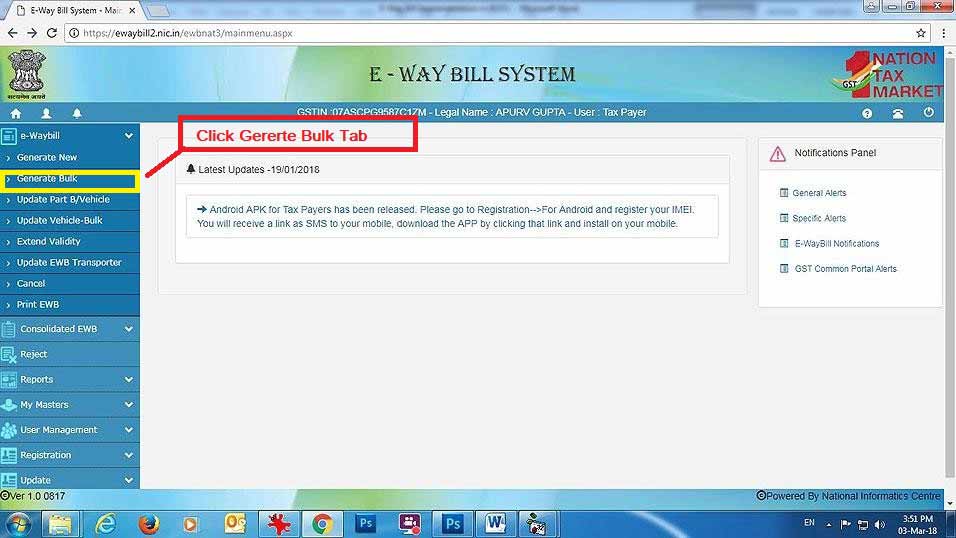
Step 2: After Login to E-Way Bill Portal, go to E-Way Bill à Generate Bulk option. Given below is the screenshot of E-Way Bill Portal.
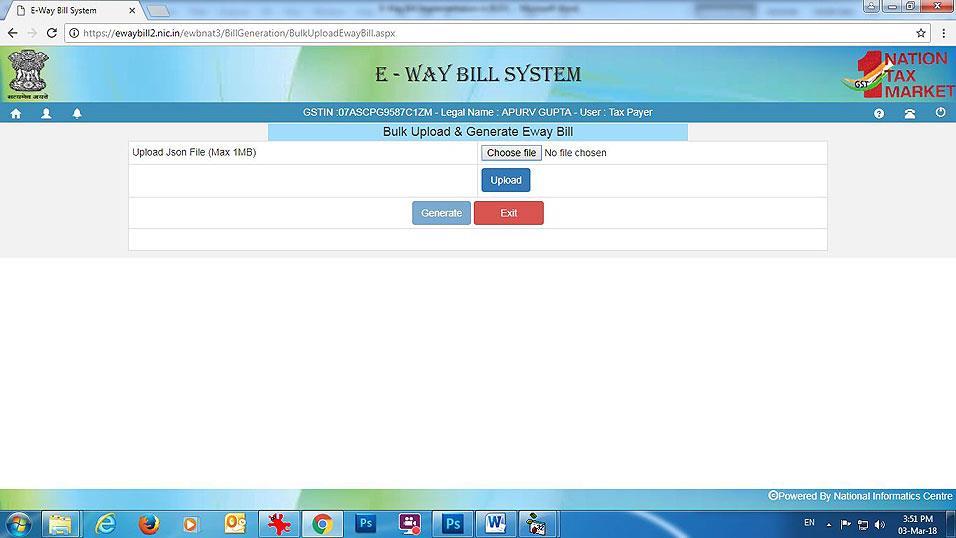
Step 3: Upload the JSON file and generate E-Way Bill No. Given below is the screenshot of E- Way Bill Portal.
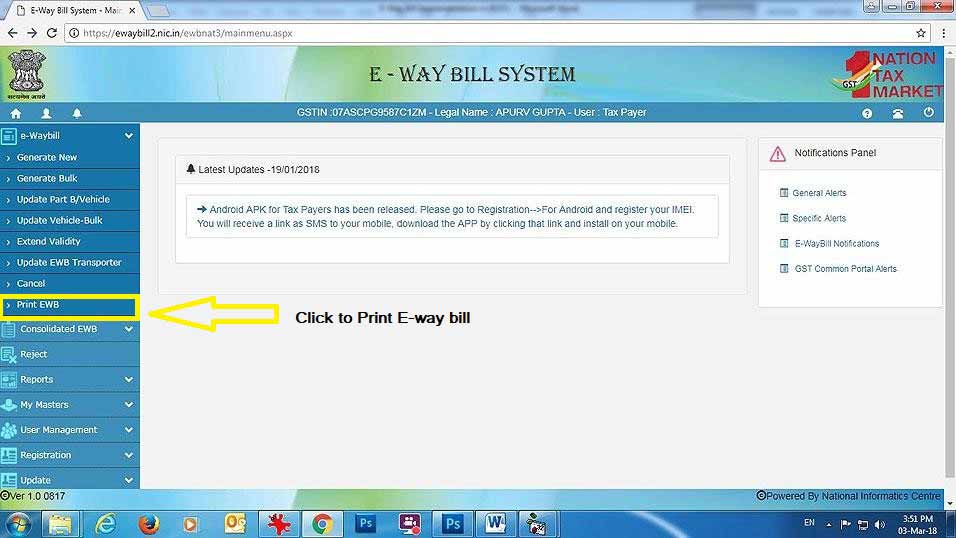
A Unique E-Way Bill No. will be generated for each invoice. After generating E-Way Bill, you need to print E-Way Bill No. from Portal. Given below are the screenshots showing How to print E-Way Bill No.

Now, enter E-Way Bill No. in E-Way Bill No. data field under Transport Details window by opening the voucher in Modify mode.
You can also generate JSON file for multiple vouchers in one go. To generate JSON file for multiple vouchers in one go, click: Transaction – GST Misc. Utilities – E-Way Bill Management a Generate E-Way Bill option. On clicking Generate E-Way Bill option a Generate E-Way Bill window appears with various options. Select JSON option. On selecting JSON option, a Select Vouchers for E-Way Bill window appears. Given below is the screenshot of Select Vouchers for E-Way Bill window.
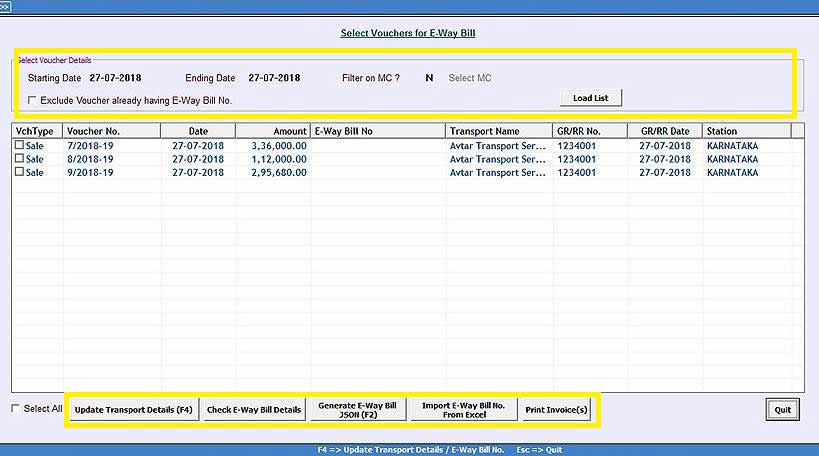
In Select Vouchers for E-Way Bill window, specify following details:
- Starting Date – Specify Starting Date from which you want to view vouchers.
- Ending Date – Specify Ending Date till which you want to view vouchers.
- Filter on MC – Specify ‘Y’, if you want to apply MC wise filter in case you are maintaining more than one MC.
- Select MC – This data field gets active when you have specified ‘Y’ under Filter on MC data field. Select the required MC for which you want to load vouchers.
- Exclude Voucher already having E-Way Bill No. – Check the checkbox Exclude Voucher already having E-Way Bill No., if you want to exclude those vouchers for which E-Way Bill No. is already generated.
- Load List – Click Load List button to load the vouchers for specified date range. On clicking Load List button, vouchers for specified date range will appear.
At the bottom of Select Vouchers for E-Way Bill window, following buttons are appearing:
- Update Transport Details (F4) – Click this button to update transport details. You can also use F4 shortcut key for the same. On clicking this button, an Update Transport Details / E- Way Bill No. window appears. Specify the data to be updated and click Update button.
- Check E-Way Bill Details – Click this button to check for errors in data, if any. Select the vouchers for which you want to check for errors in data and click Check E-Way Bill Details button. On clicking this button Check E-Way Bill Details window appears showing details of vouchers and errors in Red color if any. Correct the errors if found any.
- Generate E-Way Bill JSON – Click this button to generate E-Way Bill JSON file. On clicking this button, a Generate E-Way Bill window appears. Specify the required data in data fields and click Ok button. On clicking Ok button, again a JSON Creation message box appears with following options:
- Check Possible Errors – Click this button to check for errors in data, if any.
- Proceed with JSON – Click this button to generate JSON file for selected vouchers.
On clicking Proceed with JSON button, JSON file will be generated at the specified path. Now, Upload the JSON file on E-Way Bill Portal and generate E-Way Bill No.
- Import E-Way Bill No. from Excel – Click this button to import E-Way Bill No. from excel file which is downloaded from E-Way Bill portal after generating E-Way Bill No.s. On clicking Import E-Way Bill No. from Excel button, an Import E-Way Bill No. from Excel window appears. Given below is the screenshot of Import E-Way Bill No. from Excel window.
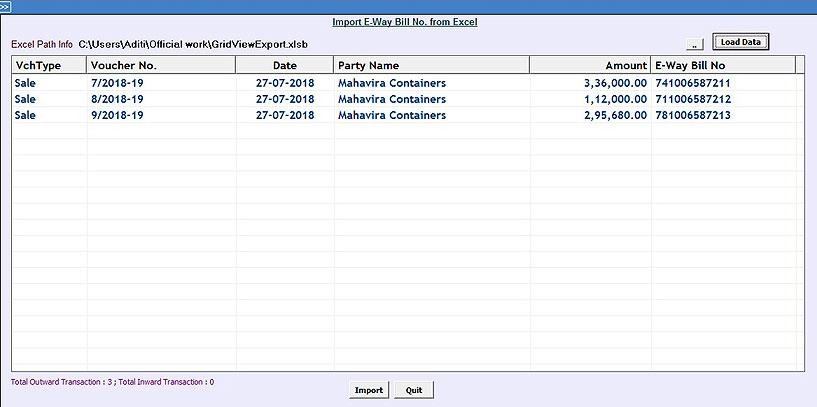
Under Import E-Way Bill No. from Excel window, specify the path of Excel file downloaded from E-Way Bill Portal and click Load Data button. On clicking Load Data button voucher details will appear on the screen with E-Way Bill No. Click Import button to update E-Way Bill No. in respective vouchers.
Print Invoice(s) – Click this button to print invoice from here only with updated Transport Details and E-Way Bill No.
For Basic Edition users only a single option is available to generate E-Way Bill.
Generation of Excel file for single/multiple vouchers
Basic Edition users can generate Excel file for single voucher at the time of saving the voucher itself or they can generate Excel file for multiple vouchers through Transactions à GST Misc. Utilities à E–Way Bill Management à Generate E-Way Bill File option.
Please Note: At the time of generating Excel file, if any error is there in data then an Excel icon will flash on the Status bar. Click on the Excel Icon and press OK on the error message box being displayed. On clicking OK button Excel file will be generated. Given below is the screenshot displaying error at the time of generating Excel file.

Rectify the error in Excel file being generated and then validate the Excel sheet. Once Excel Sheet is validated, generate JSON file using government offline utility and upload to E-Way Bill portal for generating E-Way Bill No.
Data Checklist
Before generating E-Way Bill file following points should be considered:
- Make sure GSTIN of your company and party is specified.
- Make sure UQC for E-Way Bill is specified in all Unit masters.
- tate of your company and of party is mandatory.
- PIN Code is mandatory and should have 6 numeric characters.
- Make sure valid HSN Code is specified in Item Master.
- In case of Road Transport specify either Transporter ID/ Vehicle No.
- Make sure no special characters like $#%! are present in Vehicle No.
- Make sure GR/RR Date should be equal to or greater than document date.
- Make sure no special characters like $#%! are present in GR/RR No.
- Make sure Distance is not zero and also should not be greater than 3000 kms.
With this we complete E-Way Bill Implementation in BUSY.